Tuesday, October 29, 2013

Challenge #23 - Winner

Hello there! Wow so many great entries this time. This was so hard to pick. Let's get started, shall we?


goes to challenge is Carol!

by Carol

Congratulations, Carol! We love absolutely your stitched border and the fun ink splashes!

Please email neatandtangledstamps(at)gmail.com and let us know which stamp set you would like. And feel free to display the "top tangle" badge on your blog!

There were a few other projects that caught our eye that we thought deserved some recognition, so here are the honorable mentions, or as we like to call them, the "lovely little tangles"!


by Annette Allen

by Archana

by Shirley

Well done, ladies! Please feel free to display the 'lovely little tangle' badge on your blogs!

Thank you so much to everyone who participated in the challenge! We hope you'll all play along for our next challenge in November. The DT is taking a little quick breather :) Enjoy the little time back and start thinking of holiday cards *hint hint*

Tuesday, October 22, 2013

Tutorial: How to Tackle a Sketch

Hello there. Our lovely Katie Brooks from KB Stamps is back. She was one of our wonderful contributors to our Birthday Bash. Today she is going to show you how to tackle a sketch and I hop it gives those who don't like to play along with sketch challenges a few starting points.


Happy Monday!!!  I am so exciting to be a Guest on the Little Tangles blog I can barely contain my excitement!  Ren-Yi asked me to come and share how I go about tackling a sketch and I thought about it for a long time…exactly 1/2 a second...before I said “heck yes!”  So here I am to do just that with you today.  I sure hope you find it helpful so that Ren-Yi will have me back one day in the future.

First, check out this sketch by Ms. June Houck….fabulous right?!   Yep, I thought so too.  There are lots of ways to tackle a sketch and I will say that I don’t always use the same method.  This was my thought process when I saw the sketch.

Step 1: I size up the sketch and study it a bit.  Does it have a lot of layers?  Specific elements (like those little circles)?  Is there a theme or anything that grabs my attention?  The key thing I want to know when I first look at the sketch is that if there is one element that jumps out at me and says START HERE!

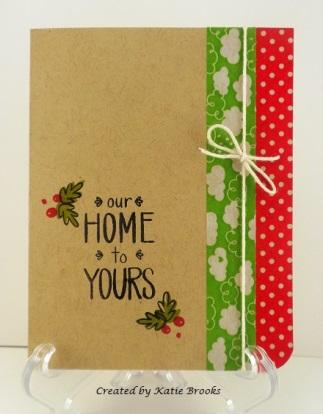
When I looked at this sketch, I first noticed it is pretty fabulously CAS.  The next thing I noticed was the little circles that could be bubbles, enamel dots, sequins….so many things.  Then I noticed the two different patterned elements going down the sides and my first thought- WASHI TAPE!  And we are off and running.  (Other options for this would include DP, stamping your own image, ribbon, etc.)

Step 2:  Next I get out my N&T stamps and check them out. I compare the themes with the various washi tapes I own and make a match. 

In this case, I have two brand new N&T sets that are begging to be inked up, Simple Christmas and Just for You, so I grabbed those.  I have options for washi for either theme but since the holiday season is coming up I decided to lean towards Christmas.


Step 3:  Having decided my theme, I’ve selected my tapes and stamps and now I want to look at my cardstock and choose a base that might accompany this.    

I love to see Kraft on holiday cards, so that’s an easy decision.

Step 4: At this point, most of my elements are chosen.   If I have any hesitation about my sentiment variations or colors, I’ll practice on scrap paper to find the right match before committing to my card stock.  When I have that down I go for it on the actual paper.

I’ve added the sentiment from “our home to yours” in black and decided to use the little evergreen boughs and berries instead of circles.

Step 5:  Add the remaining elements.

All I really have at this point to add is my washi.  BTW- (the beautiful thing about washi is the ability to reposition when you
screw up since I do all the time.  Looking at the card I decide it looks a little flat, so I decided to add some twine for a little dimension and round one of the corners, just for fun.


There you have it folks, all done.  What do you think of the final look?

Other ways to tackle a sketch that I sometimes use:
  • Start with your image (if using a stamp) and build around it
  • Start with the part that poses the biggest challenge for you and once you’ve figured out what you want there, build around it.  
  • Pick the patterned paper you like, and build around it.
 
There are probably lots of other ways to tackle sketches as well.  For me, you may be picking up on a theme that I like is to find a starting point and build around it… ;)  There is no wrong way to go about a sketch…and guess what, if you don’t like it, do it over!  I do that plenty. The key is to have fun.

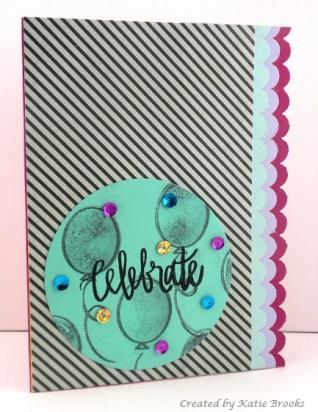
While I am here, I thought I’d show you one other take I had on this sketch.


Thanks for letting me play with you fabulous folks at Little Tangles!  It is always super fun!


Thursday, October 17, 2013

Challenge #23 - Sketch

Hi everyone - we're back with another fun challenge! As you know, we have been putting together a little bit of awareness for little Grayson and his family.


A kind soul has put up a little angel fundraiser for this family. I just wanted you to be aware of it, so look for it on the side bar.

Also a dear Little Tangles and Neat & Tangled supporter Heather Ruwe is putting a little fun card together for this champ. In addition, she is doing a GIVEAWAY for anyone who will provide card to Grayson. So hop on over there and put this week's sketch challenge to good use!

So what sketch, you ask? This one was a lovely idea by our DT June Houck. So leave her extra love this week!


To give us a good kick start with this sketch, we have a special friend on the blog today. If you are a long-time follower of Little Tangles, you will remember Miriam Prantner - my old DT sister. She remains one of the blogs i love to still regularly stalk. Check it out why...

by Miriam Prantner

Swoon swoon! Love that graphic, yet simple design.

by Ren-Yi Lo

by Amy Tsuruta


by Barb Murphy

by Charlene Bopp

by June Houck

Wow stunning right? I hope you feel inspired to play along too.

We have a wonderful prize for the challenge winner - a Neat & Tangled stamp set of the winner's choice!

Challenge Guidelines:
  • Create a NEW project based on the challenge theme. Your project must fit within the challenge theme in order to be eligible to win.
  • Submit your entry through the Inlinkz tool below. (If you have a blog, please link to the blog post with your challenge entry, not your entire blog!)
  • Link back to our challenge and display our challenge graphic in your blog post.
  • The use of Neat & Tangled stamps is not required, but it is strongly encouraged! If you don't own any Neat & Tangled stamps, check out the FREE digi stamps HERE
  • You may enter as many times as you'd like.
  • We'd love for you to be a follower of Little Tangles!
  •  You have until Sunday, Oct 27th at 11:59 EST to enter.

Monday, October 14, 2013

Challenge #22 - Winners

Hello there! Wow so many great entries this time. We have been struggling picking our top three. So many amazing entries!


goes to challenge is Flubidoo!

by Flubidoo

Congratulations, Flubidoo! What a fabulous card. We loved how you used Sunburst so creatively to make this fun out of the box card!

Please email neatandtangledstamps(at)gmail.com and let us know which stamp set you would like. And feel free to display the "top tangle" badge on your blog!

There were a few other projects that caught our eye that we thought deserved some recognition, so here are the honorable mentions, or as we like to call them, the "lovely little tangles"!


by Cornelia (fun stamping)

by Emily K.

by Lynnda

Well done, ladies! Please feel free to display the 'lovely little tangle' badge on your blogs!

Thank you so much to everyone who participated in the challenge! We hope you'll all play along for our next challenge, which starts this Thursday!
In the meantime check back every day to see what we have new in store for the Birthday Bash. See you tomorrow.

Sunday, October 6, 2013

Birthday Bash Wrap Up & Birthday Bash CASE Winners

Hello there! So we are officially closing off our Birthday Bash with announcing the winners and a bunch of wrap-up stuff...

Thank You's
First I would like make a few shout-outs to those who made this happen! In no particular order

The Little Tangles Design Team who went above and beyond in making projects, commenting and reviewing challenges, answering questions, sitting through grueling interviews ;)

The Guest Designers who brought us new techniques, eye-candy and just sheer genius creativity...
And lastly, YOU - our followers and commenters. We have 99 people stop by our blog-o and left a whopping 386 comments during the month of August during our Birthday Bash.

Take a wild guest, which day Danielle was giving away her first year's collection? ;)

Winners
We are here for winner's announcements tho, so let's get started.

We are giving away one guest designer spot, and the it goes to ... ::drum roll::

by Kristen Foreman

Congratulations, Kristen! We love your CASE study on the stunning Jennifer McGuire card. Please email neatandtangledstamps(at)gmail.com with the subject line "Birthday Bash CASE Winner - Guest Design Spot" I will schedule your Guest Design date.

We are giving away Sketch Cupcakes stamp set to one random player...


Maureen W. - you're the lucky recipient of this stunning set. Please email neatandtangledstamps(at)gmail.com with the subject line "Birthday Bash CASE Winner - Sketchy Cupcakes" and we will pop those in the mail directly to you. 


Top Three each are earning a $5 gift certificate. The Winners are

from left: Lyndal, Carol, Shirley

Well done, girls! Email neatandtangledstamps(at)gmail.com with the subject line "Birthday Bash CASE Winner - 5GC" and we will pop you instructions how to redeem it. 

Lastly I would like to offer a perk for everyone who participate in our Birthday Bash CASE challenge a small perk: Every 20$ you spend, a free pack of sequins. Please email me at neatandtangledstamps(at)gmail.com with the subject line "Birthday Bash CASE Winner - Perk" and we will pop you instructions how to redeem it.

That was a lot of fun. I hope you can come back to the many posts in August for inspiration and we look forward to returning to our regular schedule program. Don't forget there is a challenge going on :)

Tutorial: Make Your Own Pattern Paper

Hello there. SmilynStef if you remember won our Day 6 Unbirthday Birthday Challenge. So we are so happy to have her here on the blog to show us her take on making pattern paper.


I am thrilled for the opportunity to be a Guest Designer at the Little Tangles Challenge Blog.  The current challenge is to *Make Your Own Patterned Paper*.  I used glossy cardstock and my Spectrum Noir Alcohol Ink Refills and had some fun.
I started by stamping the curlicue border stamp from Neat and Tangled with Versamark ink and clear embossing powder on a 5 1/2 x 8 1/2" piece of glossy cardstock.  I rotated the image each time I stamped for variation ... the design is very forgiving, so you don't have to be precise in lining-up your images.
NTTut1wm

Next, I inked-up a foam inking tool with five colors of Spectrum Noir Alcohol Ink Refills - CG1, CG2, CG3 & CG4 (Citrus Green) together with BT7 (Blue Turquoise).  I always add several drops of blending solution before I start inking my paper.

NTTut2wm

Here's what my designer paper looked like after my first pass.

NTTut3wm

... and after my second pass.

NTTut4wm
I added more of my lightest color (CG1) and blending solution to my felt, and went back over my paper one more time to fill in the white spots.

NTTut5wm

The next step will really make your stamping pop.  I positioned my paper between plain newsprint (I save all of the pieces I get inside packages, but a few sheets of printer paper will work as well) with the stamped side-up and ironed on high heat to remove the embossing powder.  I have an iron I bought at a yard sale that I use specifically for crafting.  Make sure you lift the paper while it is still warm, and it will not stick ... if it does, just iron again to release it.

NTTut6wm

I cut my designer paper in half, so I could make two cards.  The first card uses my stamped & inked designer paper together with stamps from Kindness Matters.
NTCard1wm

I re-inked my felt with the same colors and inked more glossy cardstock.  After it dried, I used India Ink to stamp my sentiment and the two hearts and clear embossed.  One of the great things about using your Alcohol Inks for your background is that you can use the coordinating markers on your project. For a bit more contrast, I used my BT7 Spectrum Noir Marker to outline my die cut and to color in my hearts.
Since the embossing powder was ironed away, you can stamp directly on the inky background too.  I stamped the same curlicue stamp on my designer paper with India Ink. Next I added some gold Spray & Sparkle Glitter Varnish for overall sparkle.

NTTut7wm

I paired this background with black cardstock for a more dramatic look.  Since the curlicues reminded me of vintage phone cords, I finished with stamps from Just Hello.
NTCard2wm

A huge thanks to Neat & Tangled for the opportunity to design for you today ... now go get inky and have some fun.

Thursday, October 3, 2013

Challenge #22 - Make your Own Pattern Paper


Hi everyone - we're back with another fun challenge! Before we get started, I wanted to make sure to give a shout out to the open card drive here. 


If you haven't heard of this, please hop on over here to read all about it. Also our DT Amy is doing a inlinkz over on her end to give away sequins from her stash. So please consider sending your card along to Grayson when playing along in this week's challenge theme.

Print
We want you to create your own pattern paper. Yep it's time to bust out your stamping skills and go nuts with it. Also remember we have some free digis, so check those out.

Anyways, I'm going to let the latest and greatest Guest Designer Melissa Dehne kick things off. Isn't this just amazing?

by Melissa Dehne

Make sure to pay Guest Designer Melissa an extra visit. Let's see what the talented Design Team has up their sleeves:

by June Houck

by Ren-Yi Lo
by Amy Tsuruta

by Barb Murphy
By Charlene Bopp


Wow stunning right? I hope you feel inspired to play along too.

We have a wonderful prize for the challenge winner - a Neat & Tangled stamp set of the winner's choice!

Challenge Guidelines:
  • Create a NEW project based on the challenge theme. Your project must fit within the challenge theme in order to be eligible to win.
  • Submit your entry through the Inlinkz tool below. (If you have a blog, please link to the blog post with your challenge entry, not your entire blog!)
  • Link back to our challenge and display our challenge graphic in your blog post.
  • The use of Neat & Tangled stamps is not required, but it is strongly encouraged! If you don't own any Neat & Tangled stamps, check out the FREE digi stamps HERE
  • You may enter as many times as you'd like.
  • We'd love for you to be a follower of Little Tangles!
  •  You have until Sunday, Oct 13th at 11:59 EST to enter.
We hope you'll join us!!! Check back on Saturday to see the Birthday Bash CASE winners and Sunday for a special post.